This page contains affiliate links to products. We may receive a small commission for purchases made through these links while your purchase price stays the same.
Have you ever wondered how to integrate online payments into your eCommerce site? As an e-commerce entrepreneur who takes your business seriously, you want to find and accept the most secure payment methods. No matter what kind of business you are running, it is vital to be able to accept online payments.
Certain business models may manage without offering this feature. However, most companies will find expanding their customer base smoother if they provide secure and user-friendly payment gateways.
Unfortunately, this is a field where it can be hard to know where to begin your search for the right platform. After all, there are dozens of different players out there right now, each with its pros and cons. The solution is the new Authorize.Net integration offered by WPForms, one of the best and most powerful contact form plugins for WordPress.
With WPForms, you can conveniently develop Authorize.Net payment forms in WordPress, permitting credit card transactions directly on your site. As such, you can optimize the effectiveness of your online store. This article will explore what Authorize.Net entails, how it can effortlessly be integrated as a leading payment gateway system in your store, and the functionality of the WP Forms Authorize.Net add-on.
What is Authorize.Net
Authorize.Net (a company acquired by Visa in 2010) is a well-known payment gateway service provider that manages billions of transactions. Over 430,000 merchant customers worldwide have already trusted this platform.
Businesses using Authorize.Net allow customers to pay by credit card and electronic check directly on the site. This is a great advantage if we think that other online payment services (such as PayPal) require the customer first to create an account on the platform to make the transaction online. Plus, not all users have an account or want to open one, and this could complicate things and be a bottleneck during the payment process.
With Authorize.Net, your users can enter shipping information and credit card details directly on your shopping cart page and make the payment immediately. But how can you implement Authorize.Net on your eCommerce in just a few clicks? As already mentioned, the solution comes with the new WPForms add-on.
Authorize.Net addon on WPForms
Utilizing an intuitive drag-and-drop system, WPForms empowers you to create contact forms and other WordPress forms effortlessly in just a few steps. You can accomplish this without any knowledge of coding.
This plugin is considered the most powerful form generator for WordPress. It is used by over 3 million users worldwide, and after the WPForms Stripe integration, another long-awaited feature for store owners: the WPForms Authorize.Net add-on to create an Authorize.Net payment form on your WordPress site and accept credit card payments from your customers.
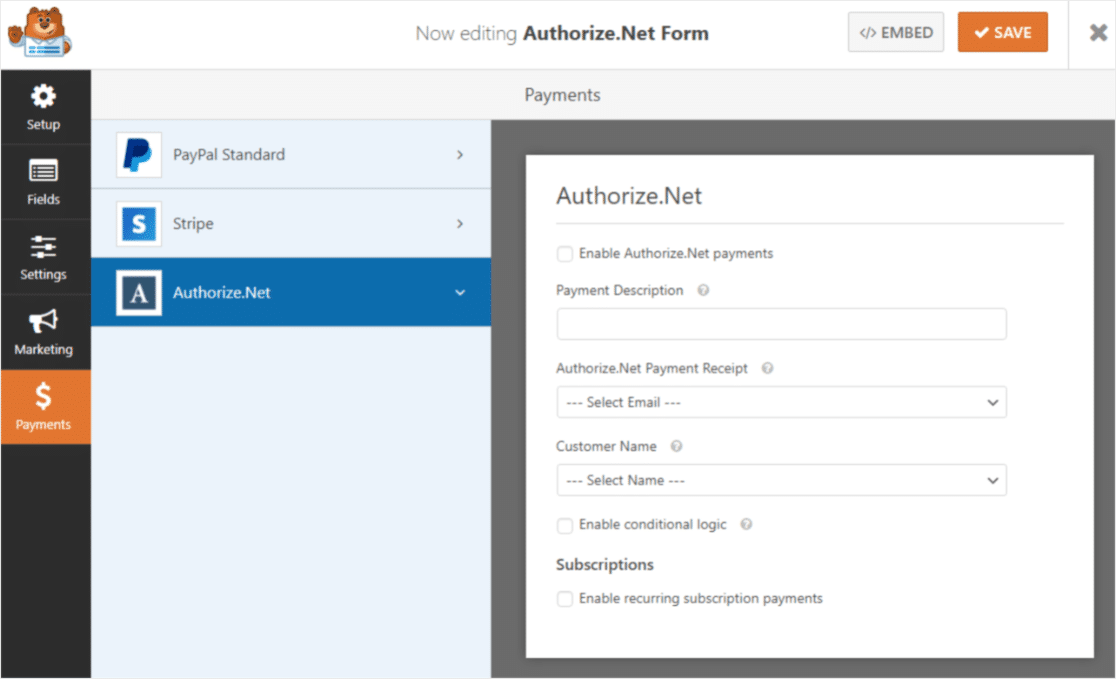
Here, you can see how the Authorize.Net integration works within the WPForms dashboard:
Benefits
The main advantage of the Authorize.Net addon for WordPress with WPForms is the straightforward configuration. Just follow the steps on the dashboard and fill in the fields!
You can accept payments anywhere and from any device. Payments can be recurring, as in the case of a subscription, or one-time, as for product purchases. The Authorize.Net module accepts all major credit cards.
WPForms also offers the ability to enable conditional logic. This way, you can make your forms more effective in terms of conversion and improve the user experience on the cart page. The module also can detect card fraud quickly and accurately.
WPForms’ payment modules are also ideal for sites that want to receive online payment through PayPal.
How to install it on WordPress sites
After installing the WPForms plugin on your WordPress site, you can select and activate the Authorize.Net add-on. Then open the WPForms settings and click on the Payments tab. The drop-down menu allows you to change the currency.
At this point, if you don’t have an account with Authorize.Net it’s time to create one! To receive payments and process transactions, you need to set your account to Live.
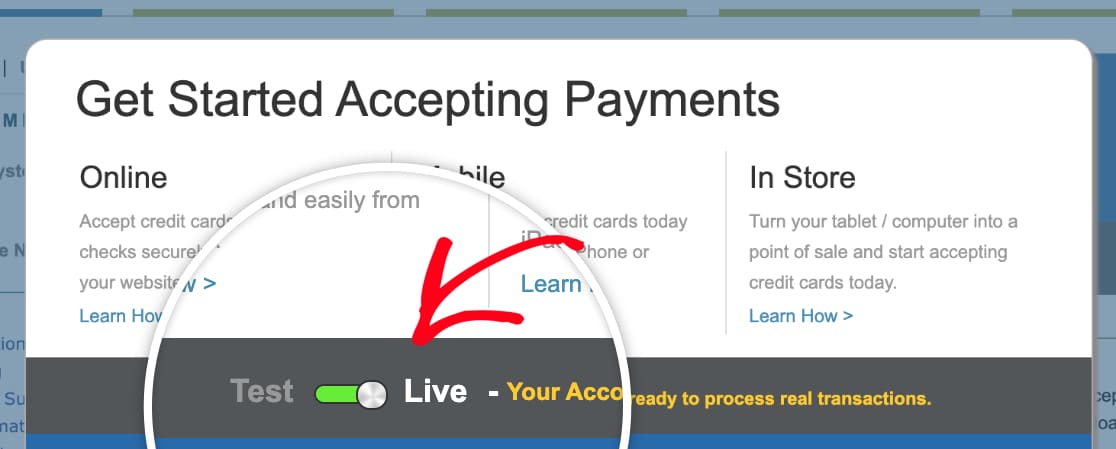
The Authorize.Net account is then ready to be connected with WPForms. In the Settings > API Credentials and Keys section, you will find the authorization codes to paste on WPForms (API login ID and Transaction key). Be careful because live transactions have different codes than test mode transactions.
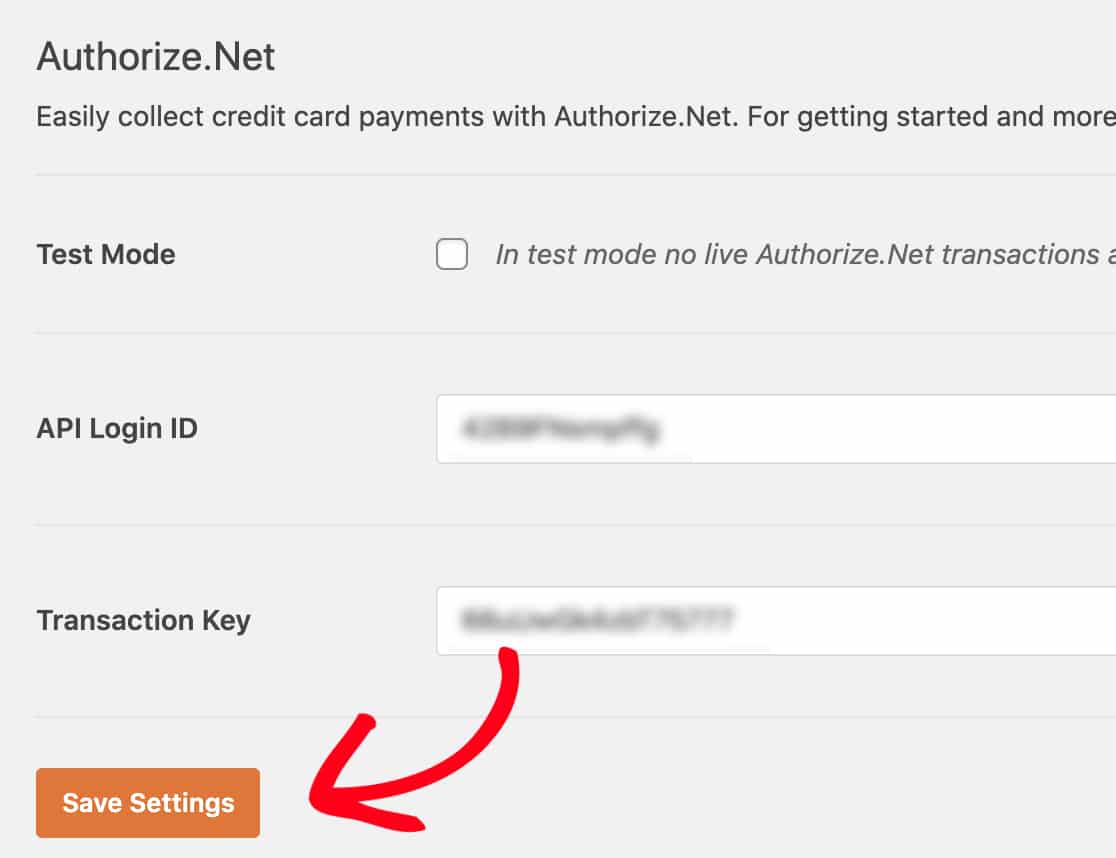
If you need to ask for a new access key, the system will require you to verify your identity and enter a PIN to authorize the process.
Once you have completed the appropriate verifications and connected Authorize.Net to your WordPress site, you can then come back to the add-on, activate it, fill in the required fields, and finally save. Payments with Authorize.Net are now active on your WPForms modules.
How much does Authorize.Net integration for WordPress site cost?
The Authorize.Net WPForms addon is available with the WPForms Elite license at € 299,50 per year (50% discount, instead of € 599). WPForms plans start at $39.50/year with interesting features that make the difference for both small blogs and large platforms.
See all WPForms plans here and discover the features.